Proxmox
Wissenswertes zu Proxmox
- Textformate BookStack
- LXC Linux Container
- Wissenswerte Links
- Hostnamen der VM oder des LXC umbenennen
- Docker, Docker Compose, Portainer
- Reverse Proxies
- Ansible
Textformate BookStack
Überschrift groß
Über schrift mittel
Überschrift klein
Überschrift winzig
Paragraph: Text mit Zeilenumbruch wiejhffchWHFVIowhfccOWHFCCwhfcWJHFEOIWECHFOWOEHFCCwhjvcfowjfcpowjefcpwojcfowoejcvwoeojfcvcvWOFCJwJCFWOICFIJWjcfpwojcfWLFCJQWFo
woiehjcfwqpojfcqwjicfcQJFCWQJWCFPOJqdfdpokjqPOPDFKJqokfdcöOQKKD
Block Quote suuhfWÖEHFÖIÖUhfwiHEWFIWefSKJFHVHÄOIWUJF)PqiujflilSENCJKÖwheföoiewhfWHECFCÖKkwhfdöWHJDFDÖqiihwdfÖWHFDÖKhfwÖKWFHqölkkfjhÖQLKIKJFWöqlfjwQÖLÖFJWqjfwöliÖJFWLLjqFljqiwdflQKJFäfdjiQÄLJDFDÄLqjfäoÄIQLJCFLJälqijfddÄQLIÄJFlqijdldfjiwLÖIQIJDLijifdfilQJLDFJ
code block

version:'3'

services:
inline code
info
success
warning
danger
LXC Linux Container
Erstellen eines neuen PVE LXC Linux Container für Docker - (Compose) - Anwendungen
Vorbereitungen in der Konsole
apt update && apt upgrade -y && apt autoremove -y && apt install net-tools unzip -y Docker installieren, deinstallieren und zugehörige Daten löschen
Docker Engine installieren:

curl -fsSL https://get.docker.com -o get-docker.sh
sh get-docker.sh

oder

curl https://get.docker.com | sh

Installation überprüfen:

docker --version:

Benutzer in die Gruppe docker aufnehmen:

usermod -aG docker root

Docker Engine deinstallieren:

apt-get purge docker-ce docker-ce-cli containerd.io

zugehörige Daten löschen:

rm -rf /var/lib/docker
rm -rf /var/lib/containerd
Visual Studio Code installieren
Docker Compose installieren
Vorbereitungen:

sudo apt-get install libffi-dev libssl-dev
sudo apt install python3-dev
sudo apt-get install -y python3 python3-pip

Docker Compose installieren:

sudo pip3 install docker-compose
chmod +x /usr/local/bin/docker-compose

Docker Service beim booten starten (Autostart von Containern)

sudo systemctl enable docker

Docker Compose Installation überprüfen:

docker-compose --version

Docker Compose File starten:

docker-compose ((-f) docker-compose.y(a)ml) up -d
Portainer installieren
 docker pull portainer/portainer-ce / docker pull portainer/portainer-ce:linux-arm
 docker run -d -p 9000:9000 -v /var/run/docker.sock:/var/run/docker.sock portainer/portainer-ce / docker run --restart always -d -p 9000:9000 -v /var/run/docker.sock:/var/run/docker.sock -v portainer_data:/data portainer/portainer-ce:linux-arm
Ü
Wissenswerte Links
https://indibit.de/reverse-proxy-mit-nginx-mehrere-server-hinter-einer-ip-per-subdomain-ansprechen/
Hostnamen der VM oder des LXC umbenennen
pct set <VMID> --hostname <newname>Docker, Docker Compose, Portainer
Installation, Konfiguration, ...
Installation Docker, Docker Compose, Portainer
- Updrade LXC
- apt update && apt upgrade -y
- Installation Docker
- apt install docker.io curl -y
- docker --version
- Installation Docker Compose
- curl -SL https://github.com/docker/compose/releases/download/v2.12.2/docker-compose-linux-x86_64 -o /usr/local/bin/docker-compose
- chmod +x /usr/local/bin/docker-compose
- Installation Portainer
- docker volume create portainer_data
- docker run -d -p 8000:8000 -p 9443:9443 --name portainer --restart=always -v /var/run/docker.sock:/var/run/docker.sock -v portainer_data:/data portainer/portainer-ce:latest
- Installation von Containern über Portainer
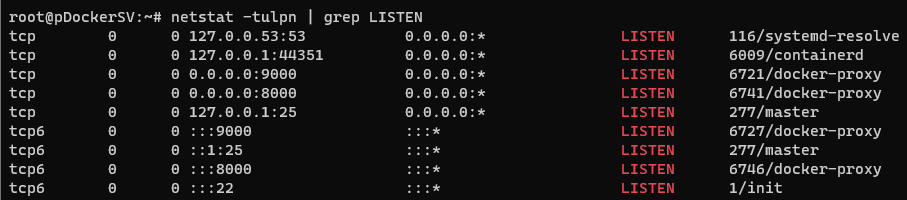
- Das Deployment kann scheitern, wenn gewählte Ports durch andere Container oder Linux bereits belegt sind. Anzeigen der belegten Ports über
netstat -tulpn | grep LISTEN
-
Ergebnis:
-
- Massnahme:
systemctl disable systemd-resolvedsystemctl stop systemd-resolved-
belegten Port freigeben und spätere erneute Belegung disablen
-
- Das Deployment kann scheitern, wenn gewählte Ports durch andere Container oder Linux bereits belegt sind. Anzeigen der belegten Ports über
Portainer und Docker Hub
- Portainer starten
- https://192.168.0.183:9000 - IP LXC:Standard Port - Password raumPunkt#1604
- Pfade AppTemplates
- https://raw.githubusercontent.com/portainer/templates/master/templates-2.0.json
- https://raw.githubusercontent.com/pi-hosted/pi-hosted/master/template/portainer-v2-amd64.json
- https://raw.githubusercontent.com/technorabilia/portainer-templates/main/lsio/templates/templates-2.0.json
- über diese Templates kann man sich Container über Portainer installieren - z.B. PiHole
- Docker Hub
- https://hub.docker.com
- Installation eines PiHole Containers über Docker Hub und docker-compose up -d
- search pihole
- nano docker-compose.yml
- insert:
- https://hub.docker.com
version: "3"

# More info at https://github.com/pi-hole/docker-pi-hole/ and https://docs.pi-hole.net/
services:
  pihole:
    container_name: pihole
    image: pihole/pihole:latest
    # For DHCP it is recommended to remove these ports and instead add: network_mode: "host"
    ports:
      - "53:53/tcp"
      - "53:53/udp"
      - "67:67/udp" # Only required if you are using Pi-hole as your DHCP server
      - "80:80/tcp"
    environment:
      TZ: 'America/Chicago'
      # WEBPASSWORD: 'set a secure password here or it will be random'
    # Volumes store your data between container upgrades
    volumes:
      - './etc-pihole:/etc/pihole'
      - './etc-dnsmasq.d:/etc/dnsmasq.d'
    #   https://github.com/pi-hole/docker-pi-hole#note-on-capabilities
    cap_add:
      - NET_ADMIN # Required if you are using Pi-hole as your DHCP server, else not needed
restart: unless-stopped-
-
- STRG-O Datei speichern
- STRG-X nano editor verlassen
docker-compose up -d
-
Interessante Container Apps
- PiHole
- Invidious
- Youtube Clone ohne Werbung
- git clone https://github.com/iv-org/invidious.git
- cd invidious
- Link zum Docker-Compose File https://docs.invidious.io/installation/
- Whoogle
- Suchmaschine ohne Werbung
- Installation über
- sudo apt update && sudo apt upgrade -y
- sudo apt install docker.io ufw
- sudo usermod -aG docker username
- sudo ufw allow 22/tcp
- sudo ufw enable
- docker run --restart=always --publish 5000:5000 --detach --name whoogle-search benbusby/whoogle-search:latest
- ip a
- sudo ufw allow 5000/tcp
- http://192.168.0.183:5000/
-


Reverse Proxies
Nginx - Apache2
ReverseProxy mit NGINX
Reverse Proxy mit nginx
nginx installieren
https://www.nginx.com/resources/wiki/start/#installing-configuring-nginx
nginx Dokumentation: Installation unter Ubuntu
nginx Konfigurationsdateien
Artikel zur Konfiguration von nginx
nginx Dokumentation: Beispielkonfigurationen für diverse Anwendungen
Die nginx Hauptkonfigurationsdatei findet man unter /etc/nginx/conf.d/
In meinen Fall findet man dort den Verweis auf zwei weitere Verzeichnisse: /etc/nginx/conf.d/ und /etc/nginx/sites-enabled/
In der Datei nginx.conf ist dies bei mir dieser entsprechende Abschnitt:
        ##
        # Virtual Host Configs
        ##

        include /etc/nginx/conf.d/*.conf;
        include /etc/nginx/sites-enabled/*;
Im Verzeichnis /etc/nginx/conf.d/ werden alle Dateien mit der Endung .conf mit eingelesen. Dies wurde durch das /*.conf; am Ende der include Anweisung festgelegt. Soll eine dort liegende Konfigurationsdatei nicht ausgeführt werden, so muss die Dateiendung geändert werden, z.B. auf .disabled.
Im Verzeichnis /etc/nginx/sites-enabled/ werden alle dort liegenden Dateien berücksichtigt, festgelegt durch das /*; am Ende der entsprechenden includeAnweisung. Soll eine Datei dort nicht ausgeführt werden, muss diese aus dem Verzeichnis entfernt werden, z.B. durch verschieben in den Ordner /etc/nginx/sites-available.
Beispiel Konfigurationsdatei für einen virtuellen nginx Host
Beispiel für eine Reverse Proxy Konfiguration
Artikel: Basic Configuration an NGINX Reverse Proxy
Der Dateiname kann beliebig sein. Im Beispiel oben würde man z.B. im Verzeichnis /etc/nginx/conf.d/die Datei herwig.de.conf benennen und wenn man sie alternativ im Verzeichnis /etc/nginx/sites-enabled/ verwendet, nur herwig.de.
server {
  listen 80;
  listen [::]:80;

  server_name herwig.de;

  location / {
      proxy_pass http://192.168.1.100/;
  }
}
Im Abschnitt server wird der virtuelle Host definiert. Hier der Server/Host mit dem Namen herwig.de. Alle Anfragen, die für herwig.de auf dem Port 80 IPv4 (listen 80;) und dem Port 80 IPv6 reinkommen, werden hier behandelt.
Im Bereich locationwird in diesem Fall festgelegt, dass die Reverse Proxa Funktion verwendet wird und alle Anfragen vom root (/) an zu http://192.168.1.100/; weitergegeben werden.
zusätzliche Optionen für den Reverse Proxy
  location / {
      proxy_pass http://192.168.1.100/;

# schaltet den Buffer des Proxys für die Verbindung aus,
# z.B. für node.js Applicationen mit Realtime Interaktionen
      proxy_buffering off;

# sendet die IP-Adresse des Clients zum Host
      proxy_set_header X-Real-IP $remote_addr;
  }
intern https nutzen
Variante ohne eigene CA
Artikel: HTTPS behind your reverse proxy
nginx Kommandos
https://www.nginx.com/resources/wiki/start/topics/tutorials/commandline/
Die nginx Willkommensseite deaktivieren
Wenn die default Seite im Verzeichnis /etc/nginx/conf.d/ liegt:
sudo mv /etc/nginx/conf.d/default.conf /etc/nginx/conf.d/default.conf.disabled
/etc/nginx/sites-enabled/ liegen:sudo mv /etc/nginx/sites-enabled/default /etc/nginx/sites-available/default
sudo nginx -t
sudo nginx -s reloadWebserver härten
Artikel: Linux Webserver einrichten und betreiben
https mit Let`s Encrypt
Um eigene Seiten auf dem nginx Webserver oder unverschlüsselte Seiten hinter dem Reverse-Proxy mit https zu betreiben kann Let`s Entcrypt verwendet werden.
Artikel: Configure HTTPS with CertbotPermalink
Artikel: How To Secure Nginx with Let's Encrypt on Ubuntu 18.04
Artikel: Letsencrypt installieren
Generelle Vorgehensweise für Let`s Encrypt
Port 80 und 443 müssen über das Internet für die Domäne, für die ein Let`s Encrypt Zertifikat angelegt werden soll, erreichbar sein.
Eine Webseite muss auf Port 80 angelegt sein.
Ein Tool unterstützt die Einrichtung für ein Let`s Encrypt Zertifikat. Solche Tools sind z.B. für Ubuntu (für nginx und Apache) und Windows IIS Server verfügbar.
Das Let`s Encrypt Zertifikat kann dann auch für andere Ports/Dienste verwendet werden, z.B. für Estos SIP (Estos ProCall Enterprise, Microsoft Skype for Business, ...) und XMPP (Jabber, Google, ...) Federation.
zu beachten
Der Automatismus zur Erneuerung der Let`s Zertifikate funktioniert für die Webseite mit Port 443. Für Estos Federation muss das Zertifikat dann wahrscheinlich über die Microsoft Management Console (MMC) nach der automatischen Erneuerung manuel importiert werden (noch nicht getestet). Dazu muss das Snap-In "Zertifikate" hinzugefügt werden.
Ubuntu cerbot installieren
Damit die Installation des Certbot ausgeführt wurde, musste die Datei /etc/apt/sources.list um eine vierte Zeile ergänzt werden.
sudo nano /etc/apt/sources.list
deb http://archive.ubuntu.com/ubuntu bionic main
deb http://archive.ubuntu.com/ubuntu bionic-security main
deb http://archive.ubuntu.com/ubuntu bionic-updates main
deb http://archive.ubuntu.com/ubuntu bionic restricted universe
Information: offiziellen Quellen für Ubuntu 18.04 (Bionic)
Die offiziellen Quellen für Ubuntu 18.04 LZS (Bionic) sind z.B. hier aufgelistet: https://wiki.ubuntuusers.de/sources.list/#Ubuntu-18-04
Die Installation des Certbots wird dann wie folgt durchgeführt:
sudo apt update
sudo apt install certbot python3-certbot-nginx
sudo certbot --nginx
$ sudo certbot --nginx
Saving debug log to /var/log/letsencrypt/letsencrypt.log
Plugins selected: Authenticator nginx, Installer nginx

Which names would you like to activate HTTPS for?
- - - - - - - - - - - - - - - - - - - - - - - - - - - - - - - - - - - - - - - -
1: subdomain.herwig.de
2: iobroker.mhe
3: herwig.de
- - - - - - - - - - - - - - - - - - - - - - - - - - - - - - - - - - - - - - - -
Select the appropriate numbers separated by commas and/or spaces, or leave input
blank to select all options shown (Enter 'c' to cancel):
Auswahl: 3 für herwig.de
blank to select all options shown (Enter 'c' to cancel): 3
Obtaining a new certificate
Performing the following challenges:
http-01 challenge for herwig.de
Waiting for verification...
Cleaning up challenges
Deploying Certificate to VirtualHost /etc/nginx/conf.d/herwig.de.conf

Please choose whether or not to redirect HTTP traffic to HTTPS, removing HTTP access.
- - - - - - - - - - - - - - - - - - - - - - - - - - - - - - - - - - - - - - - -
1: No redirect - Make no further changes to the webserver configuration.
2: Redirect - Make all requests redirect to secure HTTPS access. Choose this for
new sites, or if you're confident your site works on HTTPS. You can undo this
change by editing your web server's configuration.
- - - - - - - - - - - - - - - - - - - - - - - - - - - - - - - - - - - - - - - -
Select the appropriate number [1-2] then [enter] (press 'c' to cancel):
Auswahl: 2 für http Redirect to https
Select the appropriate number [1-2] then [enter] (press 'c' to cancel): 2
Redirecting all traffic on port 80 to ssl in /etc/nginx/conf.d/herwig.de.conf

- - - - - - - - - - - - - - - - - - - - - - - - - - - - - - - - - - - - - - - -
Congratulations! You have successfully enabled https://herwig.de

You should test your configuration at:
https://www.ssllabs.com/ssltest/analyze.html?d=herwig.de
- - - - - - - - - - - - - - - - - - - - - - - - - - - - - - - - - - - - - - - -

IMPORTANT NOTES:
 - Congratulations! Your certificate and chain have been saved at:
   /etc/letsencrypt/live/herwig.de/fullchain.pem
   Your key file has been saved at:
   /etc/letsencrypt/live/herwig.de/privkey.pem
   Your cert will expire on 2018-12-15. To obtain a new or tweaked
   version of this certificate in the future, simply run certbot again
   with the "certonly" option. To non-interactively renew *all* of
   your certificates, run "certbot renew"
Automatisch angepasste Konfigurationsdatei:
server {

  server_name herwig.de;

  location / {
      proxy_pass http://192.168.1.100/;
  }

    listen [::]:443 ssl ipv6only=on; # managed by Certbot
    listen 443 ssl; # managed by Certbot
    ssl_certificate /etc/letsencrypt/live/herwig.de/fullchain.pem; # managed by Certbot
    ssl_certificate_key /etc/letsencrypt/live/herwig.de/privkey.pem; # managed by Certbot
    include /etc/letsencrypt/options-ssl-nginx.conf; # managed by Certbot
    ssl_dhparam /etc/letsencrypt/ssl-dhparams.pem; # managed by Certbot

}

server {
    if ($host = herwig.de) {
        return 301 https://$host$request_uri;
    } # managed by Certbot


  listen 80;
  listen [::]:80;

  server_name herwig.de;
    return 404; # managed by Certbot


}
sudo certbot renew --dry-runReverse Proxy mit Apache2
NginxProxyManager
NPM IP Homelab: http://192.168.0.84:81/ User: torsten@schoene.pro PW: wie immer
https://github.com/jc21/nginx-proxy-manager
Vorbereitungen
- CT in Proxmox klonen
- apt update && apt upgrade -y
- Routerfreigaben auf den ReverseProxy einrichten - Port 80/443 für http/https der IP des RP zuordnen
Ansible
Verwaltung, Konfiguration und Wartung von Servern